Handling noise with blur and erode/dilate
In this lesson we discussed methods for smoothing out images.
The sample images provided by FIRST for 2016 CV are quite suboptimal in several ways.
You might already notice that the reflexite's coloring is weird, and that the whole image is slightly blue. We can see this better by displaying the hue channel in our code:
public void run(Mat frame) {
    postImage(frame, "Camera Feed");

    Imgproc.cvtColor(frame, frame, Imgproc.COLOR_BGR2HSV);

    ArrayList<Mat> channels = new ArrayList<Mat>();
    Core.split(frame, channels);

--> postImage(channels.get(0), "Hue channel");

    Core.inRange(channels.get(0), new Scalar(minHue.value()), new Scalar(maxHue.value()), channels.get(0));
    postImage(channels.get(0), "Hue-Filtered Frame");
}
We then see this:
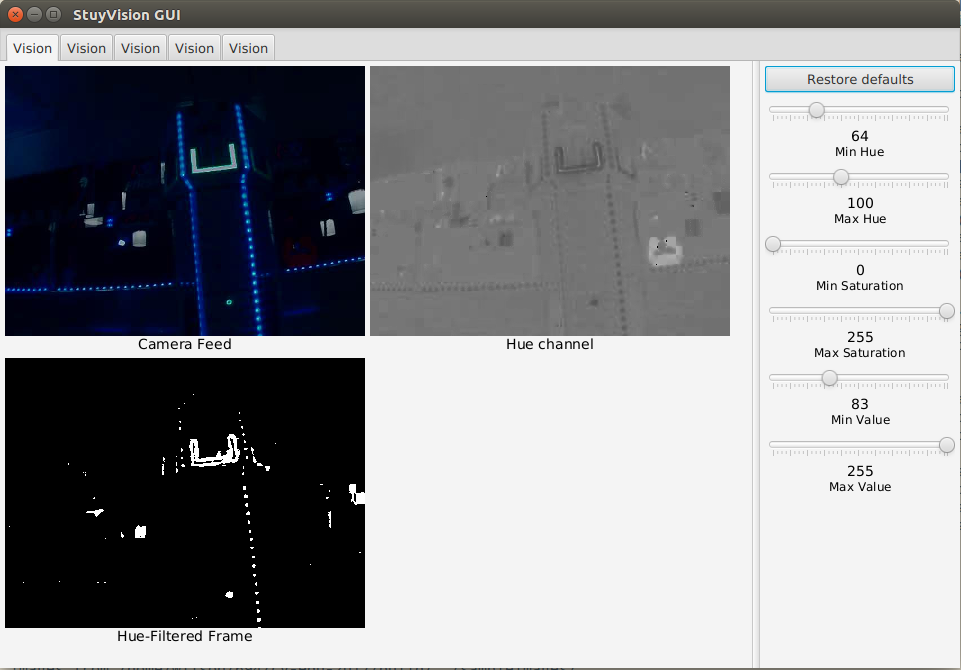
The shade of gray corresponds to the value of the hue.
Color wheel for context:
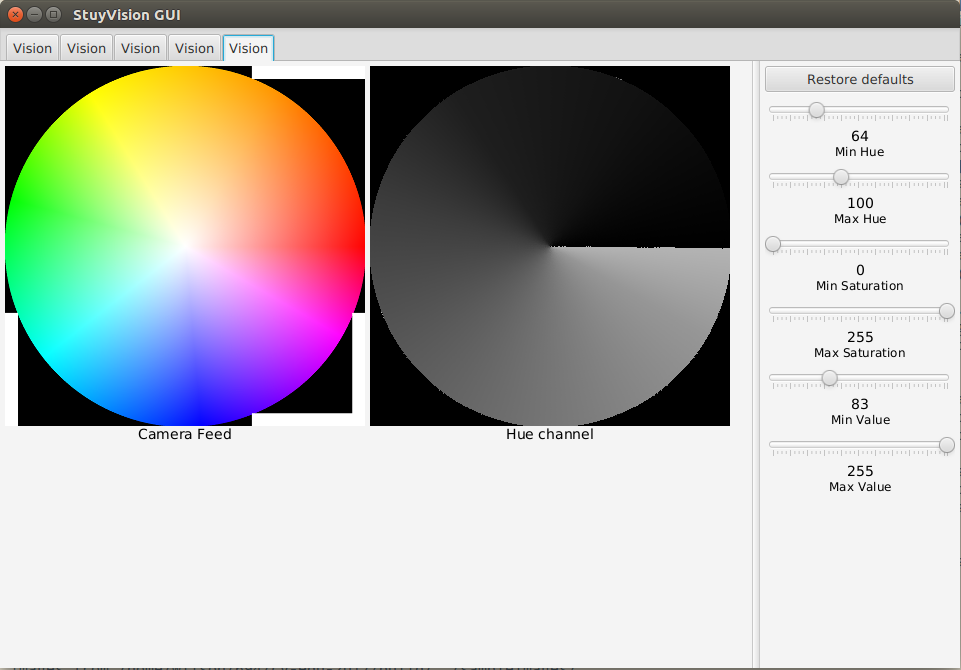
(This shows what hue values, displayed as shades of gray, correspond to what colors of the color wheel.)
Note two things: 1. the hue all over the image is blue
- the hue at the goal is not a solid color (greener at the edges and bluer in the middle). This is probably because the camera's exposure is too high.
These are serious problems (note that we get better images than this with good camera settings), and leads us to a common tool in computer vision for improving image quality: image smoothing.
Smoothing an image
There are many algorithms for blurring an image. The ones we will talk about have a consistent underlying methodology: for every pixel in the image, look at a rectangular window of pixels around it, and change the center pixel based on the values of the pixels in that rectangular window (terminology: the operation is 'convolution' of a 'kernel' over an image; more at wikipedia).
Common types of blurs:
-
Box blur: set the center pixel to the mean of the pixels in the window. This is the simplest blur.
-
Median blur: set the center pixel to the median, of the pixels in the window. This has more desirable behavior at edges. Whereas a box blur will smear everything indiscriminately, a median blur can maintain greater sharpness around edges. Think about how a median works: if two thirds of the pixels around a pixel are green, and 1/3 is black, the median will just be green.
-
Gaussian blur: set the center pixel to a weighted mean of the pixels in the window, giving more weight to closer pixels. Gaussian blurring is very often used to remove noise/static from an image.
(Aside: There are more, including the bilateral filter, which extends a gaussian blur by also giving more weight to pixels with a similar color. This makes bilateral filtering quite effective in retaining edges while smoothing out an image (if you crank up its values, you can sort of cartoon-ify an image), but is the slowest of all of these, and overkill for our purposes.)
OpenCV provide the following functions for these blurs:
// Blur mat in-place (overwrite the original image with
// the blurred image), with a "window" size of 3-by-3.
// The arguments to Size must be odd numbers, so that
// there is a specific center pixel of the window.
Imgproc.blur(mat, mat, new Size(3, 3));

// Here, `3` is the "window" side-length
Imgproc.medianBlur(mat, mat, 3);

// Ignore the `0`. The last two parameters (indirectly)
// determine the dimensions of the window in X and Y.
Imgproc.GaussianBlur(mat, mat, 0, 5, 5);
JavaDocs for these functions here. The C OpenCV docs on image smoothing have much more detail and rigor.
We'll apply a median blur to the hue channel of our image. We do this, rather than applying it to the whole original image, because we are only having problems with the hue channel. (The value channel, for example, looks just fine.)
public void run(Mat frame) {
    postImage(frame, "Camera Feed");

    Imgproc.cvtColor(frame, frame, Imgproc.COLOR_BGR2HSV);

    ArrayList<Mat> channels = new ArrayList<Mat>();
    Core.split(frame, channels);

    postImage(channels.get(0), "Hue channel");

    // Blur the hue channel with a 5-by-5 median blur.
--> Imgproc.medianBlur(channels.get(0), channels.get(0), 5);
--> postImage(channels.get(0), "Blurred hue channel");

    Core.inRange(channels.get(0), new Scalar(minHue.value()), new Scalar(maxHue.value()), channels.get(0));
    postImage(channels.get(0), "Hue-Filtered Frame");
}
From this, we get:
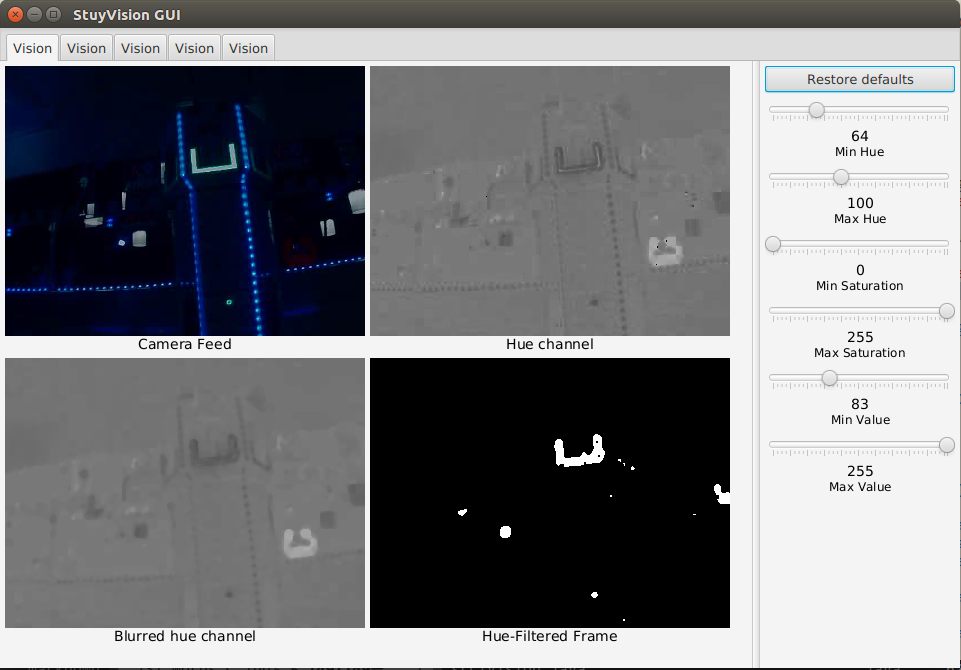
Notice that the hue of the goal is now quite smooth, and is still measurably different from the hue of the rest of the image. As a result, our hue-filtered channel is much more useful.
Erode and dilate
There's still a bit of noise in our hue-filtered image.
To get rid of that noise (both the black spots where there should be white ("negative noise"), and the white spots where there should be black ("positive noise")), we can use the erode and dilate operations.
When we erode a binary (black-and-white) image, we shrink white areas, such that small white spots are removed.
When we dilate a binary image, we bloat white areas, such that small black spots are removed.
We can do both in succession to remove each kind of noise.
Before we erode or dilate, we must create a kernel which will specify exactly how we want to erode or dilate:
Mat kernel = Imgproc.getStructuringElement(Imgproc.MORPH_RECT, new Size(3, 3);
Notice new Size(3, 3). Erode and dilate are mathematically
similar to blur operations, and just as before, we define
the dimensions of the rectangular window we'll sweep over
the image. Basically: the bigger those numbers are, the
more you will erode/dilate. The numbers must be odd.
Imgproc.MORPH_RECT is a constant representing the shape
based on which we want to erode/dilate. We are
eroding/dilating in rectangular shape. If you're curious,
try eroding/dilating with Imgproc.MORPH_ELLIPSE,
Imgproc.MORPH_CROSS, or
others.
Then, we can erode or dilate based on this kernel like so:
// Erode `mat` in-place based on `kernel`:
Imgproc.erode(mat, mat, kernel);
// Dilate `mat` in-place based on `kernel`:
Imgproc.dilate(mat, mat, kernel);
Let's apply this to our image above. We have some very small negative noise, and some positive noise around the image.
The noise in this particular image isn't such a big deal, but let's try to remove it anyway.
We'll dilate first, so that we don't poke too big holes in the goal when we erode. Then we'll erode by a bigger amount than we dilated by (so that we don't just shrink large areas to their previous size, but shrink areas even more to remove positive noise).
public void run(Mat frame) {
    ... rest of the code ...

    // Dilate
    Mat dilateKernel = Imgproc.getStructuringElement(Imgproc.MORPH_RECT, new Size(5, 5));
    Imgproc.dilate(channels.get(0), channels.get(0), dilateKernel);
    postImage(channels.get(0), "Dilated hue");

    // Erode by bigger kernel
    Mat erodeKernel = Imgproc.getStructuringElement(Imgproc.MORPH_RECT, new Size(7, 7));
    Imgproc.erode(channels.get(0), channels.get(0), erodeKernel);
    postImage(channels.get(0), "Eroded hue");
}
We get this:
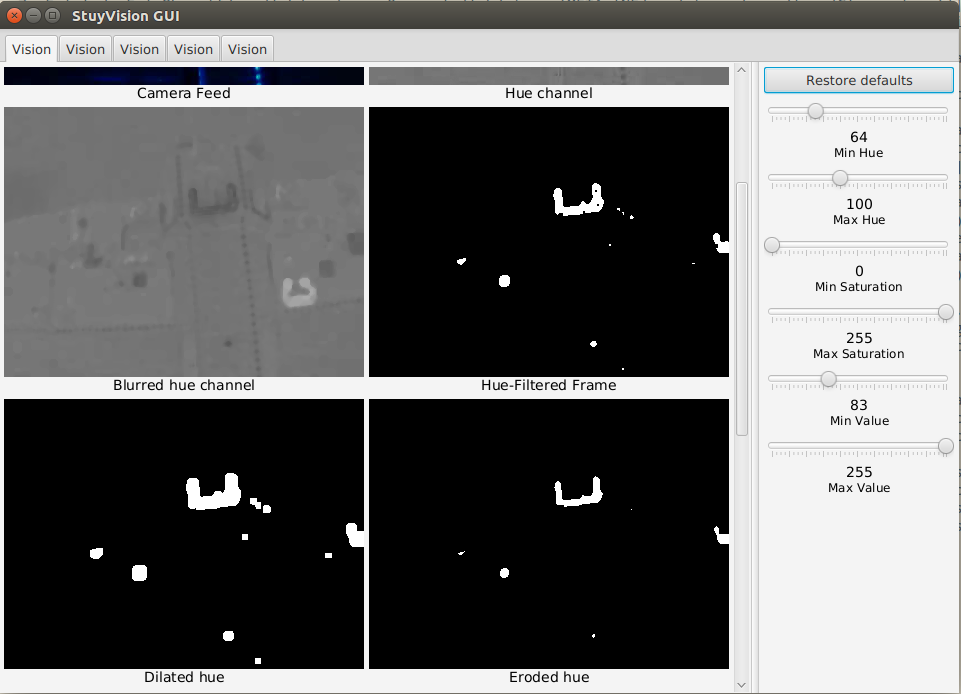
After the dilate and erode (the image labelled "Eroded hue"), the image is a bit cleaner.
Remember that only part of the process is shown here. The value channel, at least, should also be filtered and bitwise_anded with hue (it very valuable in these sample images). We are only showing hue here because hue is the only channel (for these particular images) which is so messy and in need of extra treatment. In practice, it might be wise to, for example, combine the H, S and V channels with bitwise_and, and then dilate and erode.
In practice, depending on the situation, eroding and dilating may be overkill. Remember, performance is an issue, so only what's necessary for reliable detection should be done.